Pane Cafone (Country Man's Bread)

Pane Cafone (Country Man's Bread)

Monday, December 27, 2010

Whole wheat bread with extra sharp cheddar cheese and garlic

 I'm going to be trying something a little different in the kitchen today. I've been wanting to try adding some cheese and/or garlic to the dough and see how it comes out. I originally envisioned using Gorgonzola or a strong blue cheese to compliment the full whole wheat flavor of this bread but the store was out of Gorgonzola so I went with the extra sharp cheddar.

The starter I plan to use for it comes from King Arthur flour. This stuff is really hyper active when fed on a regular basis. I've had it out on my counter for the last two days and I've been feeding it twice a day. The last feeding was this morning and it was starting to froth out the top of the container I had it in by the time I got around to starting the recipe. The beauty of todays loaves is that I have no idea how much cheese or garlic to add to each loaf so I'm just going to wing it.. I bought a 8 oz block of cheese to use so I'll cube that up and divide that up among the 3 loaves I plan to make. The garlic I added to the dough during the initial mixing. I used about 5 teaspoons. YMMV , add what you're comfortable with. Me, I really like garlic. The cheese I'm going to add just prior to the final rise when I roll out the dough and ball it up into the final shape. That way I know that most of the cheese will be distributed evenly through the dough. The final rise will be a retarded rise, taking place in the refrigerator over night. I have discovered that a slow final rise really adds a twang to the bread.  From what I've read recently, the cold rise allows the enzymes more time to do their little conversion work.  Before baking I take the bread out of the refrigerator, slash it while it's cold and let it come up to room temp. This has the added benefit of making it easier to slash and the final warming allows the dough to expand more opening up the cuts made.
Todays bread is going to see a few other changes in technique  that I've been wanting to try also. I plan to make 3 small boules and use parchment paper on top of the cooking stone that I bake with. I'm either going to wind up with 3 wonderful loaves of bread or this is going to be a complete disaster. I don't see any middle ground on this one. Here's hoping for the best.
Well the loaves are baked and didn't turn out too bad.  I haven't cut into one yet but they look nice.  When I took them out of the refrigerator this morning I realized that I had a small problem, how to transfer them from the dinner plates they were resting on to the baking stone.  I don't own a peel.  I wound up using another dinner plate over the top and just inverted them.  That allowed me to get them on the stone but it did have the effect of deflating them somewhat and wiped out the score marks I had on them.  Live and learn.  I did get a decent amount of oven spring so that helped.  Next time I think I'm going to try and proof them in a basket of some sort. 
Another thing I discovered on this bake is that parchment paper is wonderful stuff.  I did not have any sticking problems at all and laid it directly on the cooking tile, it may even be reusable.
 
Starter ready for action
Say cheese, and garlic
Resting after the 1st knead

After kneading

Cheese added after rolling out
Shaped and on a dinner plate for final rise


Bagged and ready for the final rise in the fridge
2 of the 3 loaves baked
The last loaf baking

Thursday, December 2, 2010

My current mostest favorite sourdough bread recipe


I'm not sure where I came across this recipe but I've been baking in for the last few weeks with a couple of different starters in my collection and everyone raves about it.  
I currently have 3 loaves on their final rise in the fridge now, I'll post some pictures of the final product tomorrow night when they come out of the oven.

Sourdough Whole Wheat Bread 1

List of ingredients:
**3 cups of sourdough sponge (See notes below)
3 to 3 ½ cups of unbleached white flour
¼ cup sugar or 1/8 cup honey and 1/8 cup agave syrup or ¼ cup of either (I prefer ¼ cup of honey)
¼ cup melted shortening (I use ¼ cup melted butter)
1 ½ cup milk
1 Tbsp salt
4 cups whole wheat flour
2 fresh eggs
1 cup old fashioned oats
1 Tbsp of sesame or ¼ cup sunflower seeds

**Sponge notes: Set the sponge the night before from one cup of sourdough starter, 2 ½ cups unbleached flour, and 2 cups of warm water. Be sure to put one cup of your starter back in your starter jar before you start the recipe. You will be using 3 cups of sponge in the recipe.

Let all ingredients come up to room temperature. Place 3 cups of starter in your Kitchen Aide bowl, or whatever bowl you use to make bread. Mix in one cup of the white flour and the honey/agave syrup or sugar. Add the salt and 1 cup of dry old fashioned oats, the beaten eggs and mix well with dough hook (or by hand).

Pour in the fairly warm milk and the melted butter. Mix well again. Dump in the sesame or sunflower seeds. Add 4 cups of whole wheat flower. Add about one more cup of unbleached white flour and knead about 8 minutes in the Kitchen Aide or by hand until it is ready to put on for the first rise.

Grease the inside of a large bowl with Crisco or whatever you use as a pan release agent. Put the dough in the bowl and cover with a towel. Set in a warm spot for rise for about 2 hours...then punch down, recover and let rise for 30 more minutes. Take our of the bowl, knead for about 30 seconds to get rid of any air pockets in the dough...then cut into 3 equal f you are using 4 1/2” x 8 1/2” pansor cut into two pieces if you want to make two LARGE loaves. Form into loaves (I ball the dough, flatten with a rolling pin and roll and press, sealing the edges by pinching closed) and put in non stick sprayed pans. ( I prefer Pyrex or cast iron loaf pans) The dough should just be touching the ends of the pans. Brush the tops with beaten egg white and sprinkle on some dry old fashioned oats and some sesame or sunflower seeds. Cover and let rise in a cool spot over night, or if your in a rush, in a warm spot for about a hour and a half or until ready to bake. I prefer to let mine do the final rise in the fridge over night and let it warm up on the counter for a couple of hours the next day before baking.

When ready to bake, bake in a preheated 375 degree over for about 45 minutes for 2 large loves and 40 minutes for smaller loaves. When golden brown and the internal temperature is around 185F to 195F (using an instant read thermometer), and the loaves have shrunken away from the sides, they are done. Remove from the pans and place on a wire rack, covered with a clean towel to cool. For a softer crumb, brush with melted butter when they come out of the over.

Thursday, November 11, 2010

Thoughts about pan release spray and better alternatives

I've been gone for awhile, off on a little cycling adventure across the US, but I'm back and baking again.

One of the things I was thinking of today was what I use for a release agent for my baking pans.  When I started baking I was using a leading no stick cooking spray but the thought of what may be coming out of an aerosol can and the disposal of the can always bothered me so I started looking for alternatives.   For regular cooking I use a pump up bottle with regular cooking oil in it to oil the pans but it wasn't really suitable for what I wanted so I went looking for something better.  What I ultimately came up with was a mixture of liquid lecithin from the local food co-op and regular cooking oil.  The mixture I use is 2 parts lecithin to one part oil. It's too thick to spray from a pump up sprayer so I just keep the mixture in a glass jar and brush it on the bread pans with a pastry brush.  I store the liquid lecithin/oil mix in the fridge and just stir it up with a chop stick before I use it.  The bottle of liquid lecithin stays in the fridge as well.  Just a little goes a long way and I feel that it's a much healthier alternative to canned sprays.  It's also 100% organic and works better than the canned sprays or just coating the pans with oil or butter.  It also does not impart any added flavors to the breads or baked goods.

Give it a try, I think you'll be happy with the results.

Monday, October 26, 2009

Russian Rye Starter

When I was up in Tallahassee at Betsy's, we stopped by New Leaf Whole Foods a local food co-op.  While I was there I figured I would go browse through the bulk food section and see what kind of flours they had.  I was hoping to find a nice hard red winter or maybe some spelt flour but what really caught my eye was whole rye for $0.99/lb.  I bagged up 5 lbs to take home.

I've had a dried Russian starter for awhile now but I havn't activated it since I've been wanting to make it a pure rye starter, getting fed only rye flour.  Now that I had the rye flour it was time to play.

I started the Russian starter by first soaking 1 tablespoon of it in warm water in a small jelly mason jar.  Think baby bottle wrist test warm.  After it softened up I started feeding it one tablespoon of rye flour.  The first two days of it's life it's feeding schedule was 1 tablespoon of warm water and rye flour twice a day, one in the morning while I was making coffee and once at night after I had all the dinner dishes done.  On day 3 I noticed regular bubbling forming on the top of the starter so I increased the feedings to 1/2 cup of each after moving the start to a 1 quart plastic container whose previous live was holding soup from a take out Chinese food place.  They make wonderful containers for left overs among other things.  I have one that I use for just for rising small batches of starter and I have the outside marked in 1 cup increments up to two cups.
I've heard that this Russian starter is very active, thus good for dark heavy breads, but I wasn't ready for what I was about to witness.  Verrrrrrry active stuff this Russian starter.  After I was sure it was nice and fed, I threw one cup in its new home and put it in the fridge to rest while I took off for a 4 day weekend of cycling and camping.
Monday on my return I pulled it out of the fridge and fed it 1/2 cup of rye flour and warm water in my marked feeding container.

12 o'clock


12:30 pm


1 o'clock


1:30 pm


As you can see in the pictures, it was about ready to overflow the container in less than 2 hours.

The recipe I plan to use is a New York Deli style with sauted onions in it.


New York Deli Rye 2


2 cups proofed sourdough starter
1/2 cup chopped onions
1 tablespoon olive oil
2 tablespoons butter
1/4 cup water
1 teaspoon salt
2 cups rye flour
1 cup white bread flour
You may add 2 T. caraway seeds, if you wish...I did


To proof your starter, feed it with equal parts of flour and water, cover
loosely and let it sit overnight or up to 12 hours (longer proof=sourer flavor).
At this point, measure out your 2 cups of starter into mixing bowl and proceed
with recipe.

Saute onions in olive oil until they become translucent.
Remove from heat and add butter, water and salt.
Cool to lukewarm (85 degrees F) and stir into starter.
Add the rye flour and mix well.

Getting ready to mix it all up


Add the white flour gradually, until it is too stiff to mix by hand. I used very little of the white flour just using it to flour the work surface.
Turn onto a floured surface and knead in enough remaining flour until dough is satiny. This is a very sticky dough.


Shape into an elongate loaf.  I shaped it as a round.


Place on baking sheet and let rise, covered, in a warm place for 1 to 2 hours,
or until about doubled in bulk (rising time will vary according to your starter,
but it takes longer than breads made with commercial yeast).

This dough didn't rise much


Preheat oven to 375 degrees F.
Make diagonal slashes in top of loaf with a razor blade or very sharp knife.
Bake for 40 to 50 minutes.

The finished product


I had a slice with the spaghetti dinner I cooked tonight and although the bread wasn't very tall it was still very soft and moist with a great crust.  The onion added a wonderful finishing flavor to it.  I plan to try this one again soon and try it in a pan to see what it does.

Stay tuned.

Thursday, October 15, 2009

From sweet to extra sour

I've been wanting some really extra sour, sourdough bread so I've been doing a little research on it and decided to give it a try.
I started with one tablespoon of SDI SF sourdough starter in a glass jar on the 5th of this month and I have been slowly building it up.  For the 1st week I was feeding it twice a day, once in the morning and once in the evening, 1 tablespoon (8 g) of all purpose flour and 2 teaspoons of warm water (10 g).
The beginning of second week I started doubling the amounts I fed it (2 tbl spoon of flour (16 g) & 4 tsp spoons (20 g) water.  On Wednesday morning of the second week I increased the amount again to 1/2 cup of each (65 g flour, 118 g water).

After the Wednesday morning feeding, week 2

I plan to feed it the same amount on Wednesday night and then on Thursday morning I plan to pour out half and continue feeding it 1/2 cups of flour and water.
Friday is baking day for this batch.  I plan to use Bob's Basic Sourdough Recipe to make the loaves.

On Friday I was scheduled to head out to Tallahassee to a friends house so I had to take the dough that I had made from the starter with me.  The dough was on it's initial rise and I was concerned that it would overflow the rising bucket before I could get to where I was going.  It did rise quite a bit more than I would have liked but, as it turned out, it didn't affect the final loaves.
Once I got to Betsy's house and got settled in for the weekend, I formed the loaves and put them in a couple of bread pans for the final rise.   I wish I would have taken some pictures of the finished loaves, they turned out beautiful.  Betsy has a wonderful new stove that seals up much tighter than my old stove and it really retained the moisture.  I had a custard cup of water on the bottom of the stove to cook.

The loaves turned out fantastic and we had them with a pasta dinner the following night and made french toast on Sunday morning with what was left of them.


Friday, October 9, 2009

Florida Friendship Bread?

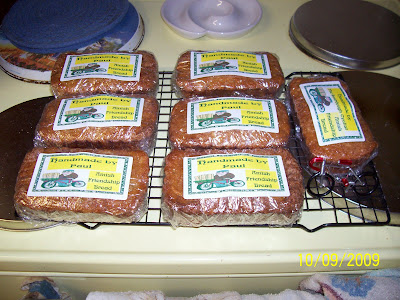
I've never seen any Amish in Florida but this latest batch of Amish Friendship Bread has a tropical Florida bent to it.  I have a night time 200K bike ride coming up this weekend so I thought I would make something for the other riders with a tropical flavor to take along for the ride.

I took the standard Amish Friendship Bread recipe and went just a little wild on it by adding 1/2c of shredded coconut,  3oz of macadamia nuts, 1/2 can of crushed pineapple and just when I thought I was done, I noticed 2 bananas on my counter top that looked like they had just a day or two of useful life left in them so they got smushed up and tossed in also.

Aloha


Instead of baking all this in 2 standard loaf pans, which would make serving a little more difficult on a bicycle, I opted to make individual loaves for everyone on the ride.
 Each loaf before baking was 260 g


A handful of tropical paradise


I split one of these with Ms Donna and she came back and told me that I don't need to be sharing these with anyone, and wanted to know where I put the rest of them.  I'll take that as a "yes these are pretty darn tastee" response.

Friday, October 2, 2009

Sourdough French Bread

With the success of the last loaf that I cooked in the dutch oven, I've decided to try my hand at a free formed french bread loaf or two.
The recipe/formula is simplicity in itself and comes from Richard Packham.  Being that this is a Richard Packham recipe it's only fair that I use the Richard Packham 1965 San Francisco Starter to make it.  I refreshed/fed a couple of starters earlier this week and his just happened to be one of them.  After renewing a cup and putting it in the fridge, I kept the remainder out on the counter and I have been feeding it a couple of times a day for the last 3 days so it is very active.  My last reduction and feeding of it left just enough active starter for this recipe.  Perfect.


Sourdough French Bread
by Richard Packham

  • 1 1/2 cups fresh starter
  • 1 cup lukewarm water (236 g)
  • 1/2 tablespoon salt (3 g) I increased to 1 tablespoon
  • 4 to 5 cups of flour
Mix all ingredients and knead well until dough is smooth and very stiff.  Let stand covered until double.  Shape into two round or oblong loaves.  I plan to make a pair of rounds.
Place on greased cookie sheets.  For this step I'm going to use my terra cotta baking tile.  Let rise until double in size.  Slash the tops with a very sharp knife.
Ready for the oven


Bake 35 minutes or until done at 425F.  During the first half of the baking time, spray the oven every ten minutes with water (or leave a pan of water in the oven while baking).  I actually use both sometimes but in this instance I plan to just put a pan of water on the bottom of the oven.

The finished products